Showing posts with label Halloween. Show all posts

Friday, October 15, 2010

Whimsical Halloween Decorations


I miss magazines!  Some of my favorite magazines are no longer in publication and it makes me sad.  A few years ago, I was reading Mary Engelbreit's Home Companion and saw this front porch in an article.  We had just moved in to our old Victorian house and had the perfect porch to recreate this look.


I studied the pictures and here is my version of the porch.


I started with clear Christmas lights from Home Depot.  I used the larger, old fashioned lights and not the smaller Christmas tree light.  I bought about 20 yards of black tulle.  It takes a lot of tulle, but luckily I got it on sale for under $1  yard at JoAnn's.  I cut the tulle into 18"strips.  Then I looped the tulle around the cord skipping every other space between the lights. (I looked back at the picture and I actually randomly placed the tulle on the wire.  However, last year I skipped every other space.)


I filled in the empty spaces with orange paper lanterns that I bought from Luna Bazaar and paper that I bought from Party City.  The glittered skulls were purchased several years ago from my favorite store The Vintage Flea, but I found these wooden skulls at Michael's this year for $1.50.  You can glitter them yourself!!


I had planned to paint jack-o-lantern faces on the lanterns but that may have to wait until next year.I also found glittered skulls, bats and spiders at Target for $4 in black, green and turquoise.  Click here to visit the Target website.


Here is how the porch looks during the day.


How do you like my porch?  I like how it looks at night and the boys like it too.  Baby Mac squeals and claps every time he goes outside.  By the way,  I still have that magazine and look at it often this time of year.


Thanks for stopping by!
Our Southern Nest

If you would like to know who won our last giveaway please click here!

Tuesday, October 5, 2010

Halloween Birthday Party

My friend Kari and I both have children the same age.  Last year was their 6th birthday, and we decide to throw a joint Halloween birthday bash.  Their birthdays are actually during Thanksgiving and Christmas.  However, if you have children whose birthdays are during those two seasons, you know that it is nearly impossible to find a date for a birthday party.


We used Christmas light, tulle and paper lanterns to decorate the her garage.


I use stitch witchery to attach different ribbons to the orange burlap table runner.  I was inspired by an article in the September/October 2009 issue of Mississippi Magazine.


We ordered 4 different types of spooky cupcakes that both boys and girls would enjoy.  Here is an example of our creepy crawly cupcakes.  We also had werewolves, witches hats, and black cats.


Each guest took home one of these adorable cookies. 


We attached these stickers on the back of each cookie.  We purchases the stickers on Etsy.com from a store called Max and Bella. 

We served our Swamp Water punch in these festive sugar rimmed glasses with a gummy worm garnish.


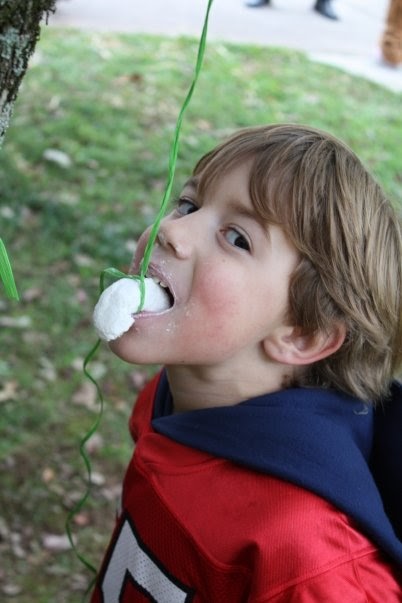
The powdered donuts were used for one of our games.  I attached raffia ribbon to each donut and we hung them from the branches of a tree.  The children had a race to see who could eat his or her donut first without using their hands.  We have no idea who won!  The children were just having so much fun trying to eat the donuts.


We hung the donuts at different heights to accomodate our guests. 


 After the donut eating contest, everyone was treated to a hayride.  What would a Halloween party be without a hayride? 


 Here is just one more shot of the vampire eating a donut.  He was so darn cute, and I just could resist sharing just one more!


We had balloon relay races!


We also had an area set up for parents to take a photo of their little goblin.  Below is my little one posed for the camera.


The little poodle was too cute for words!


Afterwards, the children played Pin The Tale On The Cat.


Each table was decorated with candleabras, halloween confetti, and glittered spiders and skulls.


We even had treats for the moms and dads.  We had an adult beverage station set up in the backyard. 


  We had so much fun planning the party and I think everyone had a great time.

Thanks for stopping by!
Our Southern Nest


Tuesday, September 28, 2010

Pumpkin Topiary Turtorial

Five or six years ago, I was inspired by an article I read in Southern Living.  The article was about making a topiary using copper tubing and pumpkins.  I just loved it and couldn't get it out of my head.  I just knew I had to try it but I did not want to use real pumpkins because of the mess and they would not last very long. 


Then one day I stumbled upon some fake pumpkins at Michael's and decided to use them instead.  I bought three pumpkins in different sizes and the plastic carving tools that were being sold beside the pumpkins.  I drew out the designs on the pumpkins and started carving away.  Within five minutes the plastic carving tools broke and I did not know what to do.  I decide to try our serrated kitchen knife, but I had to use a lot of muscle power and the knife was too big to carve the tiny details.  My last option was a wood burning tool I had used in another project, and luckily it did the job. 


It took me two days to complete two topiaries.  I tried to hot glue the pumpkins together but it did not hold them .  I punched holes where the pumpkins met (one on each side) and wired them together.  They have lasted me for 5 years and survived moves to three different states.  Sadly, last year my little rooster knocked it over and I lost a pumpkin.


But my loss is your gain!  I have made new topiaries for my porch, and I have documented my project.  For this projects you will need three pumpkins and the heated knife shown in the picture.  I bought the pumpkins from Michael's because they were cheaper than Hobby Lobby.  They only had two sizes to choose from so I decided to use two large pumpkins and one small pumpkin at the top. 


Next, I drew my patterns on my pumpkins.  Here is were you can get creative.  I free handed the stars and curly Q's but used a template for the circles so they would be the same size.  The possibilities are endless for what you could create with these pumpkins.  However, simpler designs are easier to cut out.


The next step is to cut out your design.  Just follow the directions given for the heated knife, and please be careful.  It is HOT and SHARP!  I waited until my little one was asleep before I started cutting out the designs.  My youngest is two and I think you understand why I waited until he was asleep.


My advice in cutting out the shapes is to take your time.  It is not hard to do but I wanted nice clean cuts so I took my time.


After all my shapes were out it was time to stack the pumpkins.  I first decided which sides I wanted to face the front and which pumpkin would be on the bottom.  After all of that is decided, I cut out the stem of the bottom pumpkin. (I did not cut a hole in the bottom because I inserted the lights though one of the polka dots.  You may cut a hole in the bottom pumpkin to insert the lights, but be aware that the cord may make the topiary wobbly.)  Do not make the hole too big!  I made the hole about 3-4 inches in diameter.  I then cut the same size hole in the bottom and top of the middle pumpkin.  Finally, I cut a hole in the bottom of the top pumpkin, but left the stem. 


You now have to build you topiary.  Early in the post I said I attached my topiaries with wire.  This time I tried this glue pictured below.  I had it from another project and it said it was for Styrofoam.  It goes on white, but it dries clear.  The bottle says it needs 8 hours to cure.  I will have to say that so far so good.  If it does not hold I will go back to using wire.


Once the topiaries were dry, I set them in this plant stand I bought from Walmart, I think.  It was white but I spray painted it black and wrapped it with grapevine garland.  In the past, I have used two large iron urns for the topiaries.  However, I now use the urns for something else and I needed to add height to the topiaries.  I already had these in the garage so I improvised.


The final step is to add lights.  I used old Christmas light, but you can use battery operated candles.  You could also use the orange lights that you find at Michael's.  The lights I have now are on a green cord, but I will change them to white lights on a white cord as soon as I find them!


And that is it!  The big spiders I added serve two purposes.  First, I thought they were cute and added a little something special to the pumpkins.  Second, they hide little gaps that you can see because the pumpkins will not be totally flush.  You could use leaves, boas, or other garlands for the same effect.


Sorry for the long post!  It is a fun project and you can use it again year after year.  I would LOVE to use the white pumpkins to make a pumpkin "snowman" and top it off with a witch's hat!  If you have made a pumpkin topiary, I would love to see it!  Email a picture and I will post it on my blog.

Also, I am having a giveaway this week and the winner will be announced Friday, October 1st, 2010. I will be giving away this door hanger from Dondee Hicks of Artist Tree.


If you would like a chance to win this Candy Filled Jack-O-Lantern, please click HERE and follow the instructions on how to enter.

Thanks for dropping by!
Our Southern Nest